Monthly Archives: December 2011

Cheesy Ranch Chex Mix

We’re a traditional Chex Mix type of family.  Until recently, I’ve rarely varied the recipe aside from, say, adding a cup of mixed nuts instead of a cup of peanuts.  Just to spice things up a bit around here, I went wild and tried an entirely new (to us) flavor combo: cheesy ranch.

I’ll say this: not the original.  I’ll also say this: pretty tasty nonetheless.  I don’t think I’ll be exchanging our classic Chex Mix recipe any time soon, but this was fun to try, if nothing else!

Cheesy Ranch Chex Mix

recipe adapted from Chex
makes 26 servings

Ingredients

  • 3 tablespoons butter or margarine
  • 9 cups Corn, Rice, or Wheat Chex (or any combination)
  • 2 cups bite-sized pretzel twists
  • 2 cups bite-sized cheese crackers
  • 1 cup mixed nuts
  • 1/2 cup grated parmesan cheese
  • 1 1-ounce package ranch dressing or seasoning mix
Directions
  1.  Heat oven to 250. In ungreased large roasting pan, melt butter in oven.
  2. Add cereal, pretzels, crackers, and nuts; stir to coat.  Add ranch mix and cheese; stir again.
  3. Bake 1 hour, stirring every 5 minutes.   Spread on paper towels to cool, about 15 minutes. Store in airtight container.

The Bean at Two Months

Size

What a big girl we have!  All of that eating is paying off, as Bean is growing by the minute.  She’s now eight pounds, according to our scale at home.  She still wears her newborn size clothing, but her wardrobe has expanded, as she can wear her 0-3 month clothing as well if we roll up the sleeves and legs.  Her little bottom still easily fits into her newborn size diapers, though her digestive system has outgrown them – yikes!  She wore her very last newborn dipe on her two month birthday, and is now officially a size one.  We use cloth diapers for her occasionally, but they’re gigantic on her tiny body, so we’ll have to wait a few more months until she can wear them more frequently.


Milestones

We’ve got a smile!  Bean’s tight-lipped sleep smiles have progressed to wide awake, open mouth smiles.  They’re sporadic, but they’re there!  In addition, Bean went from crying only to a much larger vocabulary of coos, goos, and grunts.  She’s much more alert now, staying up for longer periods of time and being more interested in our household happenings.  Paul and I also had a milestone this month – our first date, baby-free!  Bean stayed with Grammy, Poppy, Katie, and Soo Yeun while we spent three hours at Barnes and Noble.


Sleep

We had our huge, gigantic, earthshaking milestone this month – sleeping through the night!  On Thursday, December 8, 2011 – a day we will always cherish and remember – six week old Bean slept from midnight on the dot to 5:02 am.  And, drumroll please – the following night Bean slept from 11:30 pm to 9:00 the next morning.  Straight through!  That’s 9.5 hours!  And then the next night, 8 hours!  Since then, she’s been treating us with an occasional full night of sleep.  Bean has also been trending toward an earlier bed time (almost always before midnight now) and will sometimes go right back to sleep after a night waking if we pop a pacifier in her mouth.


Eating

Bean is still an excellent eater, chowing down about eight times per day.  She’s a bit fussy for bottles and alternates between loving and being disgusted by her pacifier.  She usually always enjoys sucking on her fists (if and when she can find them, which is typically only with help).


Social

This month, Bean attended her first party of the season (and her life).  She charmed everyone while sleeping through the Whitman Thanksgiving gatherings.  She was able to meet her Great-Grandma and Great Grandpa Poeschl and much of the rest of Grammy Mary’s side of the family.


Play Time

Bean learned her first game this month!  If someone sticks out a tongue at her, sometimes she’ll smile or stick her tongue back.  We can also now add “swinging in the baby swing” to Bean’s repertoire of pastimes.  It typically puts her to sleep, but she certainly seems to enjoy it – it calms her down when nothing else will.   Bean also enjoys riding in the front carrier, though this also tends to knock her out.  When she is awake, she enjoys looking at pictures in books, playing bicycle legs, and staring at toys.  She despises tummy time, though it’s forced upon her by her evil parents.

Breakfast Casserole for Two

Egg Bake

Egg bakes can be delicious, but they can be overkill for our small family (especially since one of us doesn’t eat solids yet).  Enter Cook’s Country’s Breakfast Casserole for Two.  We’ve made and enjoyed this before, and it’s definitely on the short list for Christmas brunch!

Breakfast Casserole for Two

recipe from April/May 2011 Cook’s Country
makes 2 servings

Ingredients

  • 3 slices bacon, chopped
  • 2 slices hearty white sandwich bread, cut into 1/2 inch pieces
  • 6 tablespoons heavy cream
  • 4 large eggs
  • 1/8 teaspoon salt
  • 1/8 teaspoon pepper
  • 2 scallions, sliced thin
  • 1/2 cup shredded sharp cheddar cheese

Directions

  1. Adjust oven rack to upper middle position and heat oven to 475 degrees.  Cook bacon in 8″ nonstick, ovensafe skillet over medium heat until crisp, about 8 minutes.  Using slotted spoon, transfer bacon to paper towel-lined plate.  Pour off all but 1 tablespoon fat from pan.
  2. Add half of bread to skillet and cook over medium heat, stirring frequently, until golden brown, 3 to 5 minutes.  Transfer to medium bowl and toss with toasted bread.
  3. Whisk cream, eggs, salt, and pepper in another medium bowl until smooth.  Stir in bacon, scallions, and cheddar.  Add egg mixture to now empty skillet and cook over medium heat, using spatula to scrape bottom of pan, until eggs are just beginning to set, about 1 minute.  Fold in bread and lightly pat mixture into even thickness.  Bake until puffed and golden brown, 7 to 9 minutes.  Serve.

More about aperture

Bean has been napping for over three hours (don’t judge).  That means my time is limited, so let’s get right to it!

Day 6: Understanding Aperture, Part 2

More about aperture today!  A recap: small number = small focal point, large number = large focal point.  This is where my camera is lacking a bit – I don’t have a fancy lens (and it isn’t interchangable), but I do have some room to adjust the aperture.  I think once I learn more about my camera (I’m digging into the handbook during the next nap time!), I might have even more control over it.

Here are some comparison photos using f/3.5 (left column) and f/8.5 (right column).  Featured subject: Louie the cat.  Adorable, I know.

Chocolate Oatmeal No Bake Cookie Recipe – and a photography lesson

Yeesh.  We’ve tackled shutter speed, ISO, and now we’re on to aperture.  You think I’d be better at photography by now.  Honestly, I felt better at it after the second day.  Now that we’re on day five, I’m a bit muddled.  I’m hoping it’ll clear up as the lessons continue.

But first… a recipe.  This is a quick and easy, down and dirty recipe for when you’re craving something sweet but don’t want to pull out all the stops.  (How many more cliches can I use in one sentence, by the way?  And why do I always misspell sentence?)  It pulls together in about five minutes.  Next time, I’ll substitute Rice Krispies for the oats.  Because, you know, it’s too healthy as is.

Chocolate Oatmeal No Bake Cookies

recipe adapted from One More Moore

Ingredients:
  • 1/4 cup butter
  • 1 cup sugar
  • 1/4 cup milk
  • 2 tablespoons cocoa
  • 1/4 cup peanut butter
  • 1 1/2 cups quick cooking oats
  • 1 teaspoon vanilla

Directions:

  1. Combine butter, sugar, milk and cocoa in a saucepan. Bring to a rolling boil, and boil for 1 minute.
  2. Stir in remaining ingredients and drop onto wax/foil paper. Let cool until set.

Day 5: Understanding Aperture

Aperture refers to the physical opening of the camera lens.  A larger number means a smaller lens to view through; a smaller number is a wider opening.  Counter-intuitive, but true.  A low number (wide aperture) means a shallow depth of field; that is, one focal point is chosen and the background is blurred. A high  number (small aperture) makes the entire photo crisp and in focus.

I don’t have a fancy camera lens – I can only choose between two apertures for any given shot.  The two photos below show the same ISO and shutter speed, varying only in aperture.  Do I see the difference?  Yes.  Do I understand it yet?  Not quite.  But soon… hopefully… soon.

ISO 80 at 1/10 sec., f/3.5

ISO 80 at 1/10 sec., f/8

Pagache Recipe (and photography day four)

Day Four’s photography assignment centered around ISO.  I can’t say I completely understand it, even after fiddling around with it… but I did get some photos of a delicious pagache!

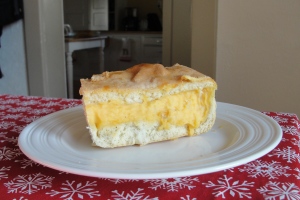
Pagache is a Polish stuffed pizza.  It’s a layer of bread, then a cheesy potato filling, topped with another layer of bread.  What’s not to love?  It’s a Cook’s Country recipe.  Their bread recipes are the only ones I’ll use any more – every time I try another recipe, it falls flat.  Well, not literally… but it certainly doesn’t compare.  So here’s the recipe… and keep reading if you want to hear my ramblings about the photography as well.  (As you can tell from the photo, I haven’t learned very much yet… but I’m working on it.)

polish pizza

Pagache (Polish Stuffed Pizza)

adapted from Cook’s Country Lost Reciepes
makes 4-5 servings

Ingredients

  • 1 cup warm water (110 degrees)
  • 1 tablespoon olive oil
  • 1/2 teaspoon sugar
  • 3 cups all purpose flour (extra quarter cup may be needed)
  • 1 1/2 teaspoons rapid rise or instant yeast
  • salt and pepper
  • 1 pound russet potatoes, peeled and cut into 1″ chunks
  • 2 cups shredded sharp cheddar cheese
  • 3 tablespoons unsalted butter

Directions:

  1. Mix water, oil, and sugar in large measuring cup.  Mix 3 cups flour, yeast, and 1/2 teaspoon salt in the bowl of a stand mixer fitted with the dough hook.  With the mixture on low, add the water mixture.  After the dough comes together, increase hte speed to medium and mix until shiny and smooth, 5 to 7 minutes.  (Add remaining flour as needed if too sticky.)  Turn the dough out onto a heavily floured surface, shape into a ball, and place into a greased bowl.  Cover bowl with plastic wrap and let rest in a warm place until doubled in size, about 1.5 hours.
  2. Cover the potatoes with one inch of water in a large saucepan.  Bring to a simmer over medium high heat; reduce heat to medium and simmer until potatoes are tender, about 15 minutes.  Drain, then mash until smooth.  Stir in cheese and 2 tablespoons butter; season with salt and pepper.
  3. Adjust oven rack to the middle position and preheat to 400 degrees.  Roll the dough into a large rectangle (9 by 18″), with the short side facing you.  Spread the potato filling on the bottom half of the dough and fold the other half of the dough over ht filling.  Pinch the edges to seal and transfer to a 9×9″ baking dish.  Gently press down on the dough until it touches the sides of the dish.  Prick the top of the dough several times with a fork and bake until golden brown, about 30 minutes.
  4. Turn the pagache out onto a cooling rack.  Melt the remaining tablespoon of butter and brush over the top.  Sprinkle with 1/2 teaspoon salt.  Let cool 10 minutes.  Cut in half, and then into strips.  Serve.
And now… for the photography.

Day 4: Learning ISO

OK, like I said… totally stumped.  I think I’ll need a few more lessons before I understand this one!  I set up an experiment where I set the shutter speed on auto and manually controlled the ISO.  All of the photos looked about the same – but the shutter speed changed as I adjusted the ISO.  From what I can tell… a higher ISO correlates to a faster shutter speed.  And we want a fast shutter speed.  The drawback of a high ISO (according to my lesson anyway… I couldn’t tell the difference) is a grainy picture.

Scrumptious Sunday, Second Edition

On Scrumptious Sunday, I take a look back at my week’s worth of favorite recipes floating around on the internet and choose my favorites to share with you (and hopefully try out for myself in the near future).   Click on the photos for links to recipes.  Hooray for followthrough!

Baked Chicken Fajitas from Real Mom Kitchen

Crockpot Baked Potatoes from Skip to My Lou

Crockpot Hawaiian Chicken from The Mommy Diaries

Baked Ziti Casserole from My Kitchen Addiction

Vanilla Pudding Sauce from Creations by Kara

Hasselback Garlic Cheesy Bread from Lauren's Latest

Broccoli Cheddar Soup from The Curvy Carrot

Cheesy Vegetable Bake – Recipe

This is a simple make-ahead supper, easy to pop in the oven when company’s over.  It’s actually the first meal I prepared after Bean was born.  (That’s right – I went four weeks without doing anything more than reheating.  Don’t judge.)

I made this when my sister-in-law and her daughter stayed for the weekend.   With eggplant, zucchini, yellow squash, tomatoes, and onions in the mix, I was nervous that my sixth grade niece would balk.  Perhaps she was just being polite, but she ate it.  (Disclaimer: She did pick around the eggplant and tomatoes.)

Cheesy Vegetable Bake

adapted from Real Simple
makes 4 servings

Ingredients

  • 1/2 pound dry, small-shaped pasta
  • 1 tablespoon balsamic vinegar
  • 3/4 teaspoon kosher salt
  • 1/4 cup olive oil
  • 1 medium zucchini
  • 1 yellow squash
  • 1 medium eggplant
  • 1 large yellow onion
  • 2 large cloves garlic, minced
  • 1 1/2 teaspoons fresh oregano or 1/2 teaspoon dried oregano
  • 4 plum tomatoes, chopped
  • 1 cup pasta sauce
  • 3/4 cup (3 ounces) crumbled Feta
  • 1/4 teaspoon black pepper
  • 2 cups (8 ounces) shredded mozzarella

Directions

  1. In a large pot, cook the pasta according to the package directions. Meanwhile, whisk together the vinegar, 1/2 teaspoon of the salt, and 1 tablespoon of the oil in a small bowl.
  2. Cut the zucchini, squash, eggplant, and onion into bite sized pieces and place on a baking sheet. Brush with the vinaigrette. Heat broiler on high. Broil until tender, 6 minutes per side.  Reduce heat to 350 if baking right away; turn oven off if freezing.
  3. Place the empty pasta pot over low heat. Add the garlic and the remaining oil and cook for 3 minutes.  Add the drained pasta, vegetables, oregano, tomatoes, pasta sauce, Feta, black pepper,  and the remaining salt and toss.
  4. Transfer to a 9-by-13-inch baking dish. Sprinkle with the mozzarella. Cover and bake for 30 minutes. Uncover and bake for 20 minutes longer.  Serve immediately.

To freeze: Assemble (but do not bake) the casserole. Cover tightly with two layers of aluminum foil. Store for up to 3 months

To reheat: Thaw overnight in the refrigerator.  Cover and heat in a 350° F oven for 30 minutes. Uncover and heat for 20 minutes longer.

Day 3 – Out Comes the Camera

I’m on Day 3 of 31 days to a better photo, and hooray – the camera came out today!  I fiddled around with shutter speed today – something I’d never even considered before I started this journey.  On My 3 Boybarians, Darcy has a fantastic analogy about finding the perfect shutter speed for a photo:

Imagine you’re at the sink with a small cup. You want to fill the cup with water.  So you reach for the faucet. If you leave the water on too long, the cup will overflow and spill.  If you don’t leave it on long enough, your cup will not fill.  You need to leave the faucet running for just the right amount of time to fill the cup, but not go over.  Using that analogy – you need to leave your shutter open for just the right amount of time to let in light to fill your photo and record your image, but not spill over and overexpose it.

Take a peek at my practice shots!  I had a sleepy subject – Bean was out like a light.  My favorite turned out to be shutter speed 1/1.3.  Any slower and her hand was blurred, but faster was too dark.

1/1.3

Day 3: Shooting Fast vs. Shooting Slow

I kept my aperture at 3.5 for all of these photos, but changed the shutter speed.  I took these photos in my bedroom with the blinds open but not pulled up.  It was cloudy outside and I didn’t turn on any lights or the flash, so it was pretty dim in the room.  My findings?  If the shutter speed was too fast, the photo came out completely black.  Slow shutter speeds let it much more light, but it was impossible to keep my hand from moving for multiple seconds when I took the photo.  Moving even a fraction of an inch made the picture blurry.   Also, this was with a still subject – if Bean had been awake it would have been even worse.  I think if I was using a tripod I would have had better results.

Why Didn’t I Think of That?

My photography homework today is simple: find and read my camera’s manual.  How is it that I haven’t done this yet?  I spent $250 on a camera and then proceeded to use it on it’s automatic setting for two years.  Because I hadn’t read the manual.  I already learned a few tips and tricks – even if I stopped following along with the “31 Days to a Better Photo” course, I’d be a better photographer.  But am I stopping there?  Oh no.  I’ve got too much cuteness to document!

Day Two: Find Your Camera Manual

After reading through my camera manual, I’m ready to answer the five questions set out for today’s assignment.  (I’m using a Sony Cybershot DSC-H20, in case you’re interested.)  The manual was very basic – it explained how to locate features and navigate the camera – but it didn’t do a great job of explaining just what those features are.  To go more in depth, I’ll have to find the Handbook CD Rom that came with the camera.  A job for another day!

How do you change the mode of the camera – auto / program, aperture priority, shutter priority?
Hmmm… interesting question.  I’m not even exactly sure what the question is asking, but I’ll give it my best shot.  On the top of the camera, there’s a wheel called the mode dial (on the bottom right of the picture below).  It has several choices:

  • Scene Selection (SCN) – choose from a variety of camera presets, such as fireworks, advanced sports shooting, and beach
  • Easy (EASY) – limits features and makes text larger (perhaps you’d want to do this if you were letting a grandparent or child use the camera)
  • Intelligent Auto Adjust (letter i followed by a camera icon) – automatically recognizes a scene to be twilight, landscape, portrait, etc.
  • Program Auto (P) – sets shutter speed and aperture automatically, but allows access to various settings from the menut
  • Manual Exposure Shooting (M) – allows you to manually set shutter speed and aperture value
  • Movie Mode (film strip icon) – record video

What do the icons on your camera mean? The flower, the running man, a face, mountains, stars, etc. What does each symbol represent?

  • ISO – High sensitivity.  Takes images without a flash in low lighting without blurring.
  • Two people – Soft snap.  Focuses on the foreground and blurs the background.
  • Running man – Advanced sports shooting.  Anticipates the movement of the subject and shifts focus there.
  • Icon of mountains – Landscape.  Focuses on a distant subject.
  • Icon of person with moon – Twilight portrait.  Shoots portraits in low light with flash.
  • Moon – Twilight.  Shoots a low light scene.
  • Fork and knife – Gourmet.  Takes a natural shot of food.
  • Palm tree – Beach.  Makes water photos bluer.
  • Snowman – Snow.  Makes a snow scene brighter.
  • Fireworks – fireworks.  Captures photos of fireworks.

Which wheel controls shutter speed?  Which wheel controls aperture?
In Manual mode, the left and right buttons control aperture value, while up and down control shutter speed.

How do you find the white balance menu and change it?
In shooting mode, hit menu and press the down button until you get to the white balance menu.  The white balance is set to WBAuto, but you can change it to daylight (sun), cloudy (cloud), fluorescent light 1, 2, or 3 (rectangle with lines coming out of it), incandescent (lightbulb), flash (lightning bolt), one push (two triangles below a square), or one push set (two triangles, a square, and the word SET).

How do you change ISO?
In shooting mode, hit menu and press the down button until you get to the ISO menu.  You can choose auto or a number from ISO 80 to ISO 3200.

Now I know how to find all of these features… maybe tomorrow I’ll find out what some of them do!

31 Days to a Better Photo

While surfing the internet on my Nook (okay, my mom’s Nook) at 1:00 yesterday morning (ah, the joys of breastfeeding), I stumbled across a blog called Life with My 3 Boybarians: Boys, Books, Blogging, and Photography.  I was particularly interested in her series 31 Days to a Better Photo.  I’m on maternity leave, so I have the time.  I’ve got a newborn baby, so I have the inspiration.  The real question is… do I have the motivation and follow-through?  I’d say that one of my least desirable characteristics is my lack of perseverance in basically all projects that I begin.  Do I have it in me?  Only time will tell.

Day One : Welcome
December 4, 2011

We don’t even touch the camera on day one.  Semi disappointing… but a little relieving.  I’m already one day closer to having a better photo, and I didn’t even have to do anything… except answer the two questions that are posed on the blog:

When did you realize how much you loved photos? What motivates you to love your images?

I wouldn’t say I have a passion for photography or photographs, but I do find a sense of pride and accomplishment in a photo well taken.  Not only does it preserve a memory, but a good photo can capture the spirit of the moment you’re in.  I want to look back on photos with more than personal thoughts of, “What a fun camping trip!” and “I can’t believe I thought I was fat back then.”  I would like anyone looking at it – not just those who know the subjects – to be moved by the picture.

Scrumptious Sunday

I think I’ll try something new.  Fingers crossed, it will stick!  I have a bit of a problem with “follow through,” though, so we’ll see… it’s so much fun to drool over other people’s culinary creations, though, that I think this may be a habit that will stick.

Thus begins a new series called Scrumptious Sunday, in which I scour the internet, sharing only the most appealing ideas. (Can you tell I have a sweet tooth?)  Click on the pictures for links.

Chewy Lemon Cookies from How Sweet It Is

Two-Minute Mug Brownie from The Family Kitchen

Ranch Dressing from The Curvy Carrot

Molten Chocolate Cake from Recipe Shoebox

Revolutionary Mac & Cheese from Macaroni and Cheesecake

Slow Cooker Recipes from Mama and Baby Love (a collection of make-ahead recipes)

Homemade Nilla Wafers from Fix Me a Snack

Cookie Packaging from My Kitchen Addiction (not technically a recipe, but still...)

Pudding Pie from Dinner: A Love Story

My Happiness Project Recap

Inspired by The Happiness Project by Gretchen Rubin, I created my own.  It was almost a year ago that I completed it, but I truly think it changed my life for the better.  As it’s been nine months since I’ve worked on it (strange how that coincides with finding out I was pregnant!  I guess I had other things on my mind…), I think I can take down this blog’s section that was devoted to it, but I did want to document my progress.    It was fun to go back and look at the changes that stuck, and ones that slowly slipped away (or never caught on to begin with!).  Reviewing these has given me a bit of renewed gusto as well – maybe I’ll try another happiness project in the future!

April 2010 – Organization
My main accomplishments this month were setting up and maintaining a weekly to do list, cleaning schedule, meal plan, empty inbox, do it now philosophy, and grocery item and price list.  This is the area where I’ve not only kept up most of my accomplishments, but have gotten better!  Yay, me!

May 2010 – Friendship
I continue to attend exercise classes at the Y (filled with potential friends), reply to friends’ calls and e-mails immediately, and occasionally use Facebook to keep in touch.  A big “oops” on the YMCA classes.  I didn’t continue them, and never really made any new friends.  I am better about using Facebook now, though.

June 2010 – Passions
I found that my passions are cooking, camping, reading, and exploring with my husband, and learned that while I am not passionate about blogging, it’s still useful as a documentation tool.  I set up 100 Things to Make to guide as a cooking goal.  I made 45 of the 100 things to make.  Not fantastic… but better than nothing!  

July 2010 – Travel
This month was focused on our Mediterranean cruise.  Among the many lessons that came out of the trip, I found that it’s advantageous to pack light, research a destination and refer to it frequently, bring a battery operated alarm clock, and prepare for jet lag.  Two other essential lessons: function trumps fashion, and always ask for directions.

August and September 2010 – Health
We eat balanced meals, and I got sporadically better at including vegetables into my diet.  I am taking a multivitamin nearly daily, and have established a better habit of exercising (including attending Zumba and 30 minute fitness classes).  I go to sleep between 9:30 and 10:30 and wake 7-8 hours later.  Sleep has taken a big hit since the Bean joined our family!  A multivitamin is still in play, though exercise and healthy eating need to step it up a notch.  All in all… I have not done well in this area.

October 2010 – Cooking
I started our “top ten” main dish list and am committed to becoming an expert at them.  I made a grocery list that revolves around these meals and so we can have ingredients in stock for quality meals whenever we’re ready.  I also took a step outside of my usual recipe books and made some meals using nothing but my own previous knowledge.  I’ve since taken a cooking class that was quite a bit of fun, and have expanded my cooking repertoire.  A success!

November 2010 – Blogging
I successfully blogged every day this month!  Surprisingly (though I suppose I should have expected it, with all of the practice), as the month went on writing posts became easier rather than more difficult.  Blogging daily made me see that anything can be a post – I just have to remember to snap a few pictures or jot down a few words so I can remember!  I didn’t fare well on this front.  But I’m back!

December 2010 – Family
I took a “blogging break” this month.  While I still posted fairly regularly, I drastically cut back the hours I spent surfing around on other people’s blogs.  This left plenty of time for my little family (just Paul and I!) and both of our families.  We had plenty of holiday fun with all, including an 11-day stay up north with my in-laws.  A by-product of not blogging is getting more face time with the world, so I’ve at least done that well.

January 2011 – Reading
The year’s off to a bang with a few books under my belt already.  I signed up for seven reading challenges – perhaps too many to handle, but some of them overlap.  I read seven books this month – hopefully this will increase next month, as I’m in the middle of five as of January 30.  I stopped keeping track, but have been reading quite a bit of baby-related books lately (mostly in the middle of the night with a babe in arms!).

February 2011 – Love
So far I’ve checked and started to read out a handful of workbooks and marriage-building books from the library.  We’ve started our once-monthly Sunday morning dates to work on our relationship.  Our relationship is still going strong, though we don’t have regular dates or relationship meetings.

Cheese Stromboli (a.k.a. Pizza Pinwheels)

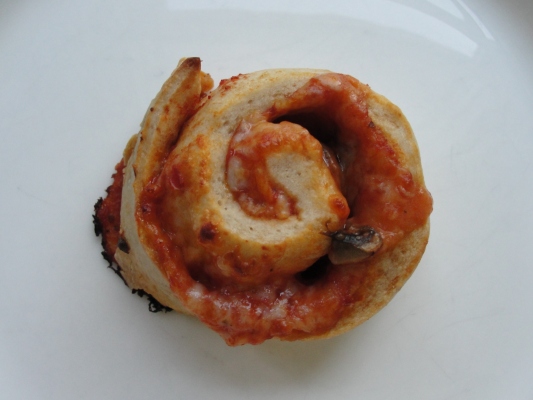
We’ve never eaten stromboli before, so I can’t say this is an authentic recipe, or could even officially be categorized as stromboli.  Over at Fix Me A Snack Cindy affectionately refers to them as Pizza Pinwheels, and we just might steal that name.  They’re fun to eat (particularly with ranch dipping sauce), but the name stromboli just sounds so official.  Pizza pinwheels it is!

Cheese Stromboli

(a.k.a. Pizza Pinwheels)

recipe adapted from Fix Me A Snack
makes 10 stromboli

Ingredients

  • 1 pound pizza dough
  • 1 1/2 tablespoon olive oil
  • 1/4 cup pizza sauce
  • 1/3 cup shredded mild cheddar cheese
  • 1/3 cup shredded mozzarella cheese
  • sauteed mushrooms
Directions
  1. Preheat oven to 450 degrees Fahrenheit.
  2. Allow the dough to come close to room temperature so that it is easy to work with.  Shape into a 6×14 inch rectangle.
  3. Place the dough on a lightly floured surface. Spread on the olive oil then the sauce, cheese, and mushrooms.  Tightly roll up the dough and pinch the loose edge to adhere it to the roll.
  4. Using a serrated knife, slice the log into 2-inch segments. Gently reshape the segments into circles and place 2-3″ apart, swirl side up, on a parchment-lined baking sheet.
  5. Bake for 8 minutes or until the dough starts to brown. Allow the stromboli to cool for a few minutes on the baking sheet. Serve or transfer to a cooling rack. The stromboli can be frozen in an airtight container for up to a month.

The Bean at One Month

Size
Bean is a whopping 7 pounds (up from 5 pounds 4 ounces when she left the hospital).  She wears newborn size diapers and clothes.  We weren’t prepared for her to be such a little pipsqueak, so she only had two outfits that fit (thanks, Auntie Em!).  Aunt Sue and Uncle Bob brought over another three cozy sets of itty bitty sleepers, so we have about five outfits in the rotation.

Milestones
Bean’s biggest milestone this month was making her grand entrance into the world!  It’s been a month of firsts for our whole family.  First cry, first diaper change, first car ride, first doctor’s visit, first trip to the grocery store, first bath… the list goes on and on! 

Sleep
Bean is a fantastic sleeper and napper from 2 in the morning until 9 in the evening.  From 10 pm-2 am, however, we have a wild woman on our hands!  She’s awake, awake, awake, and no amount of rocking, feeding, or holding will put her in a deep enough sleep to set down.  If she’s in a good mood, we can all manage in a sort of sleep-deprived trance… but lots of times she’s a little fuss budget and we’re ready to pull our hair out.  We are extremely lucky, though, because usually after fussing for a few hours, we get a stretch of five, six, or even seven hours of straight sleep.  If we can get her to start that stretch at 11:00, we’ll be golden!

Eating
This growing baby eats about ten times per day, which means lots of snuggle time with Mommy.  Bean took her first bottle like a champ on her one month birthday, so now Daddy gets a turn to feed her as well.  

Social
For such a teeny tot, Bean sure has a wide social circle!  We’ve had dozens of visitors that have come to meet her, and though she typically sleeps through the visits, I’m sure she can feel how much everyone loves her!  Aunt Emy came to visit from Texas, Aunt Carla and Jasmine made the long drive from Superior to spend a weekend, Grandma and Grandpa made a trip from Park Falls to visit one-day old Bean, and Grammy and Poppy drive across town several times each week.  Bean and I also go to Mom’s Club at the hospital where she was born, and she’s already made several “baby friends.” 

Play Time
At any given moment, Bean appears to be in one of four states: sleeping, eating, fussing, or staring into space.  As the weeks go by, though, she’s certainly becoming more alert.  Play time usually consists of tummy time, dancing in Mommy or Daddy’s arms, or staring at pictures in her crib.